Here, I will chonical the days of my life. My journey as a wife and learning how to be Mrs. Wonderful to my Mr. Everything. My adventure in making our first house into a cozy home. My love for romance and beauty as an event coordinator and sharing my excitement for all things pretty in between. My So here it is, raw and uncut. Our story, Our life, One Blog at a time.

DIY URNS - Head Table

Sunday, January 31, 2010

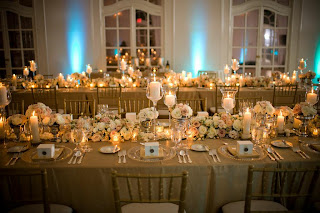
Going off my previous post, I have decided to recreate the below image by making my own urns.


I went around looking for the perfect sized urns. Not too big, nor too small. Something just right! Not overpowering but definitely makes a statement.

I went to Beverly's {my local craft store} and came across these! PERFECTO! At $14.99 each, I just had to have em. But when I realized that was $14.99 times 10 {bridesmaids} I started second guessing it.... hhmmmm... oh well! Gotta have em!


To replicate the first image above the first thing that came to mind was PAINT!! =) I jetted Home Depot and purchased this

to spray the outter area of the urn. Two coats did the job. To create a little more detail, I decided to spray paint the inside with this...


{ooooh aaaaah}


And to make it juuuust right, Ramon and I hand painted the outter edge in a pretty metallic gold using this kind of paint


{oooooh aaaaaah}


And VOILA! A beautiful, easy, peasy DIY project that will be sure to wow our guests!

Don't you think these bridesmaid bouquets


will look fabulous in these urns?

HEADTABLE! Can I pull it off?

Wednesday, January 27, 2010

Creating a beautiful focal point for my husband-to-be and my bridal party is as important as important can be. These people have been so good to us, have been so supportive during our trials and tribulations and have always stood by our sides. So in my book, it's only right to give back a little of what they've given us by gracing them with a picture perfect table scape.
I want to bring all elements that are lush, abundant, textured, white, warm, elegant and topping everything off with a candlelight romance.

Below is an image that I earn to replicate. Isn't she a beauty?


Each bridesmaid bouquet will be showcased on a bed of green moss displayed in a white urn shown in the image below.
{source: Bride Sophisticate}
A candlelight setting will be incorporated by using stemmed hurricane votives. I'm using the image below as my inspiration. {ooooooh, aaaahhhhh! Goodness gracious! Just look at that table scape. Breathtaking, isn't it}

As far as linens, I am in a desperate search of scoring on affordable specialty linens or brainstorming a perfect swagged table linen using an ivory material, however, this is a subject in itself and will have to post about my linen adventure later ;)

I can't wait to get a move on with bringing this vision to life. I hope it will be all that I dream it will be. {crossing my fingers}

DIY Save the Dates - DONE!!!!

Thursday, January 21, 2010

OH-EM-GEEE! You have no idea how happy I am with our Save the Dates. I have been designing these STD's on and off since July 2009, so to actually see the results in real life, in all it's beauty, definitely made the blood, sweat and tears all woth while.


So without further ado, I give you our DO IT YOURSELF Save the Dates!!!


And I can't forget about our SUPER STAR vendors that helped make it all happen. Reviews will be made but figured they deserved a quick shout out here on this post! =)

Inspiration: Jessica from From Marriage to Motherhood previously known as An Atlanta Bride

Graphic Designer: My very talented friend from Project Wedding, Alex. We worked very close together with this project. Thanks Alex for being so patient with me ;) I recommend her for all your graphic stationary needs. She's the best to work with!!

Magnets: Keith from Magnets.com is the MAN! He was so helpful through this whole process.

Folded Cards: 175 Metallic "Gold Leaf" folded cards were purchased from Cards and Pockets.

Print and Cut: Kinkos did a fantastic job with printing and cutting every piece. Service could've been better but the quality was great! We spent more than we would've liked but in my opinion, it was worth the time saved and the perfection it displayed.

*** If tou like this DIY project and decide to use it and post about it, please give me credit with a link directed back to this blog. Thanks a bunch!! =)

DIY: Crystal Accents for Flower Arrangements

Tuesday, January 19, 2010

I am having a few centerpieces that will be full and lush. Although they'll already be as beautiful as can be, I still wanted to spruce them up a bit by incorporating some bling! So I decided to add crystal accents.


They will be placed as if it were in a bouquet. The only difference is that they will be clear crystals and will be placed in a few centerpieces.


DIRECTIONS:

STEP 1: Pull out your handy dandy bead caddy

{I just love this special compartment for all my beading tools}

STEP 2: Gather all your supplies

  1. crystal beads
  2. crimp beads
  3. wire {in this case I used a 20 gauge wire for durability purposes}
  4. wire cutters
  5. flat head crimper

STEP 3: Measure and cut your wire to desired length {in this case I measured at 7 inches. You should consult with your florist to get exact measurements}


STEP 4: Take your flat head crimper, bend at an angle {You will need this bend to ensure your crystal will not fall off stem}

STEP 5: Thread your crystal through stem. Make sure bend is performing it's duty.

STEP 6: Thread your crimp bead {This bead ensures proper placement of the crystal}

STEP 7: Using your flat head crimper, crimp bead to secure proper placement.

AND VOILA! A beautiful addition to your floral arrangements.


oooooooh....

aaaaaahhhhh!

If you like this idea, decide to incorporate in your wedding and also blog about it, please give me credit and direct a link back to this blog. Thanks a bunch!!

MAKE ME UP!!!

Monday, January 18, 2010

Before I go go.... {<--- I love that song!}

Today, LET'S TALK MAKE UP!

This week, I've be on the prowl for an out of this world make up artist. I never knew searching for one would be so difficult. But of course, with my luck, it has! ;)

I have gotten back a ton of responses but none I'd be most interested in. The one I do want to book {oh so badly} is Sherrie Long which was recommended by our lovely Vera Devera from My $10K Wedding. However she is charging me close to $500 for just me. This includes hair and make up. Unfortunately, all I need her for is to make me up but it looks like she doesn't split packages when it comes to the bride. {what a heart breaker}

There have been a few others I've tried to contact but have yet to hear back from. So instead of the anticipation of awaiting their responses, I decided to do a little make up inspiration soul searching.

I have narrowed it down to three looks. And yes, all looks are displayed on this one single girl. HA! Do you see a trend? ;)

{natural tones with a smoky eye}

{Tan face with a heavier smoky eye}

{pink frost look}
Obviously, all 3 looks look pretty much the same, but in my opionion they all have slight differences.

Which one would you chose?

GLAMOROUS BLOG AWARD!

Saturday, January 16, 2010

Man-o-man. This must be my lucky day! Two awards in one day?! I am definitely feeling the love ;)

I am more than ecstatic to accept this Glamorous Blog Award from one of my all time fav bloggers, Red White Bride. Thanks girl! You're the BEST!


And then next set of GLAM brides I'd like to award are...

drum roll please...

BEAUTIFUL BLOGGER goes to....

I am absolutely smitten that our very own Vera Devera from My $10,000 Wedding has passed the BEAUTIFUL BLOGGER award to little ol me! {{Love ya girl!}}


Here are the rules:

1. Thank the person who gave you the award.
2. Paste the award on your blog.
3. Link back to the person who gave you the award.
4. Share seven interesting things about yourself.
5. Nominate up to 7 more beautiful bloggers.
6. Link the seven bloggers you nominate.

HERE GOES...

  1. My name is really spelled Jary"s". I was named after my dad, Jary. My aunt changed it to Jaryce. She said it was more feminine.
  2. My birthday is one day after Ramon's birthday.
  3. I have a huge phobia of clusters. Especially in 3D. Yuk!
  4. When I was in the second grade, I dreamed that I would one day be an opera singer. LOL!
  5. I am addicted to Bare Escentuals make up.
  6. I think about my wedding day in and day out.
  7. The biggest thing I'll always struggle with is learning how to say "no".
I'd like to now pass this beautiful torch to seven beautiful bloggers :)

  1. To the lovely Jeana. My first blogging buddy: My Dream Ring
  2. My gorgeous friend Faith: Love.Family.Marriage
  3. Amanda who rocks her Milly Gown! {impressive}: The Shuman Family
  4. Shannon, the realest one out there: Lost in White Chiffon
  5. Stacey, the faithful blogger: Thoughts of the all Consumed Bride
  6. Last but certainly not least, my girl from Red White Bride

GIVEAWAY: 100 piece stationary set

Thursday, January 14, 2010

you heard right, there is an awesome giveaway that's being hosted by the New Mexican Bride. She has been kind enough to host a generous giveaway!!

The lucky winner will receive either 100 Save the Dates, 100 Invitations or 100 Thank You cards. Can't go wrong with that!!

Click HERE to read all about it. Enter to win!

Real Weddings. Gorgeous Photography

OH-EM-GEE! Can we just take a second to sit back and live through these breathtaking moments that Perspective Eye Photography was able to capture.
Time to INHALE.....


Now exhale.
Thanks to The Wedding Cabaret for inspiring me to re post this dreamy real wedding!
 

Custom Blogger Template by Brunette Studio 2009

Back to TOP